Learn about building construction and renovation
- tools, equipment, planning, managing risks
- floors, roofs, walls, windows, doors
- painting, plumbing electrical and more.
Lesson Structure
There are 9 lessons in this course:
-
Introduction to Building Renovation Projects
-
Identifying Constraints
-
What and Why are you renovating
-
Determining what is worth doing
-
Where to begin
-
What tooms to renovate
-
Managing risks - avoiding surprises
-
Determining costs
-
Dealing with subcontractors and tradesmen
-
Safety on Site
-
Allowable tolerances
-
Core Structural and Site Works
-
Moisture problems - drainage, condensation, plumbing, roof leaks etc
-
Biological damage -animals, mould, dry rot, etc
-
Fire damage
-
Foundations
-
Load bearing beams
-
Repairing damaged walls and roofs
-
Using scaffolds, cranes, temporary supports
-
Replacing/Repairing Roofs and Floors
-
Roof characteristics
-
Roof coverings -slates, tiles, thatch, shingles, metal sheet, etc
-
Roof repair Jobs
-
Cleaning and Painting roofs
-
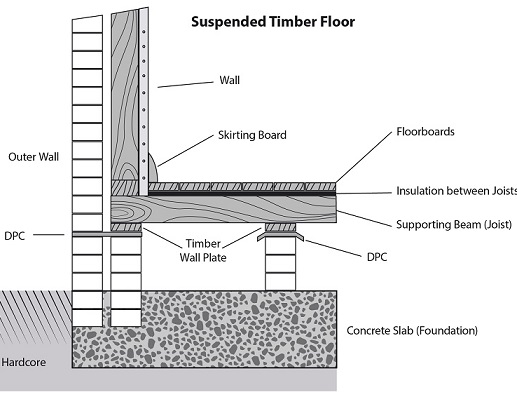
Floors - ground floors, upper floors, suspended floors, etc
-
Floor finishes
-
Solid floors, wood floors
-
Floor repair jobs
-
Cleaning and staining floors
-
Floor coverings -linoleum
-
Doors, Windows and walls
-
Wall maintenance
-
Rendering
-
Sealing
-
Cleaning efflorescence, types of stains, etc
-
Preserving timber
-
Repair jobs
-
Re-pointing
-
Replacing bricks
-
Window frame materials - aluminium, metal, UPVC, wood
-
Window types
-
Repairing broken window glass
-
Doors -panelled, flush, ledged and braced
-
How to hang a door
-
Adjusting existing doors
-
Plastering and Tiling
-
Plastering tools
-
Using plaster
-
Cutting plasterboard
-
Fixing plasterboard to walls
-
Jointing plasterboard
-
Repairing holes in plasterboard
-
Repairing cracks
-
Fixing plasterboard to ceilings
-
Plastering over plasterboard
-
Finishing outside corners
-
Tiling tools
-
Tiling floors
-
Tiling walls
-
Carpentry Renovation
-
Carpentry tools - hammers, saws, chisels, planes and other hand tools
-
Power tools - nail guns, saws, drills, grinders, planes, sanders
-
Choosing wood -types of wood
-
Buying wood - stress grading timber
-
Working with wood
-
Types of joints -edge, angled, framing, housing, halving, dowel
-
Fixing joints -nails, screws, glues, other fasteners
-
Finishing -sandpaper, wood fillers
-
Applying woodworking skills
-
Painting
-
Painting tools
-
Paint work
-
Before painting - preparing different surfaces
-
What to paint a surface with - brick, concrete, cement, stone, plaster, metal, wood
-
Preparing to paint
-
Using brushes
-
Cleaning and storing brushes
-
Using rollers - cleaning and storing
-
Spray painting
-
Plumbing Basics
-
Types of plumbing jobs
-
Roof plumbing and guttering
-
Drainage plumbing
-
Grey water plumbing
-
Water supply - water tanks 0- underground tanks, other water sources
-
Plumbing tools
-
Plumbing fittings
-
Working with copper pipes - cutting, joining
-
Working with plastic pipes - cutting, joining
-
Replacing taps
-
Earth bonding
-
Sanitary appliances
-
Electrical Basics
-
Understanding electricity - current, voltage, resistance, Ohm's law, Voltage
-
Basic home electrics
-
Tools -voltage tester, socket tester, other tools
-
Basic wiring jobs - wiring a plug, wiring a light switch
-
Light fittings
-
Lighting design
-
Solar power
-
Energy ratings
-
Renovating a Room
-
Planning a room renovation
-
Scheduling works
-
Planning time
-
Drawing a budget
-
Project management
-
Choosing materials and appliances
-
Special Project
WHAT MIGHT BE INVOLVED IN A RENO PROJECT?
 Regardless of how much work is involved, it still makes sense to think about what is involved and what is involved, and the best order in which to approach the work. Sometimes when ordering bespoke items e.g. new windows of a specific size and material the item may be delayed due to difficulty obtaining the materials. In these cases, you have to work out if there is something else which can be done in the meantime or whether doing it will risk having to re-do it after the windows have been installed.
Let's take a look at a possible room renovation schedule.
1. Planning - work out as accurately as possible what needs to be done, and if using subcontractors get estimates so you can use this information in your budget. Work out the order of tasks. It's really important to apply for any permits needed well in advance to avoid delays. If you need to access plans, get hold of them.
2. Preparation - remove furniture and non-fixed items from the room (including expensive light fittings or door handles if necessary). If you have carpet that you don't want to risk damaging, this could be rolled up and removed. Make sure you have tarpaulins or dust sheets to protect surfaces and non-movable items from paint, dust etc. If walls need to be demolished or units, appliances and other fittings dismantled then this can now be done. If necessary arrange for a skip to be on-site.
3. Walls - if new walls are going in e.g. a new partition, these should be set out first i.e. studs put into position.
4. Doors and windows - new door and window frames should be put in place.
5. Routing of services - electric cables and plumbing pipes need to be positioned and installed inside walls, floors and ceilings. If you have planned a kitchen or bathroom renovation which requires subcontractors to re-route services then having a detailed plan will help them to position wall sockets, switches and outlets for taps accurately.
6. Plaster and dry lining - next would be a good time to make good the walls and ceilings. If skirtings are being installed or replaced do this too. The covers of light switches and sockets can be added when the walls are finished.
7. Painting - walls and ceilings can be painted. Position masking tape where needed beforehand.
8. Fitted cupboards and units - these can go in before or after walls are finished. If you are installing a fitted wardrobe in a bedroom you may not need to paint the wall which will be covered to the same standard as that which is visible.
9. Flooring - replace floor coverings if required.
10. Finishes - put on any door and cabinet furniture, install lamp shades, etc.
11. Clean up - actually you will need to clean up after most of the stages above to remove dust and debris. At the end you're just doing a final clean.
ENROL or Use our FREE Course Advice Service to Connect with a Tutor